Models made by Airbrushheaven staff

Models made by Airbrushheaven staff

Friday 29 July 2016

1/48 Zaku II - Part 7


Need to do some work on the upper legs. The top leg armour & the covers for the side of the knee joint followed the usual process & were primed like the rest of the kit, but I did glue in the front piece the fittings joint for the energy cables ready.
 
Instead of doing it like in the instructions, the hip joints were made as a normal model making & they are just 2 pieces with a poly cap in the centre. These were primed & painted in Duraluminium.
 
I know on the finished model it won’t be seen, but I like to try to give some detail to the kit, so on the knee joints I painted the inner sections in Burnt Iron & what is meant to be bolt heads in Brass.  The knee covers were given light coats of UK Azure Blue & then dry some highlights of Steel in the recesses.
 
The covers for the top of the leg were painted with the darker UK Mediterranean Blue & with Steel for highlights where I thought it was needed. These & the knee covers just push into place.
 
To add some contrast the knee cover was primed & painted in the same Light Grey as the torso with some of the darker blue just to blend them in a bit.  All these bits now push into the already made lower legs & they are nearly done.
 
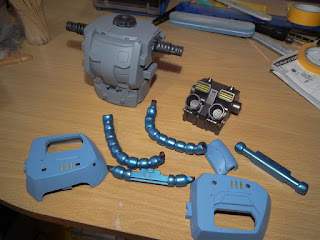
All the pieces for the side energy cables were sanded & primed as before & went through the same painting process to produce the very shiny metallic blue effect.  When it comes to fitting, the cables to the legs please take great care when pushing the poly caps onto the pieces & then gently push the pieces together before putting on the model.
I tried to be smart at first by putting the large parts on the kit & then fit the small single pieces; well I pushed to hard & caught the metallic paint so had to sand & re spray one side.
The hip joints pushed into the top of the legs & now there are finished.
 

The arms need to be finished now & the top armour was primed & these & the shoulder joints sprayed in the darker blue & some steel accents added to the recesses. The elbow joints had some detail work added like the knees just for my personal enjoyment.
 
The covers for the elbow were done in light grey top follow the theme for the legs & all the pieces & the earlier lower arm parts fitted together.

Just the hands, gun & side armour to do & it's finished!!

Friday 8 July 2016

1/48 Zaku II - Part 6


Most of the major parts have now been done or part assembled, so let us get some of the smaller pieces done ready for final assembly.
The backpack is one large moulded piece with two exhaust verniers at the bottom. The usual grey primer method for the base & some Vallejo Plate Mail primer (VAL 70.628) for the verniers got them started.
Backpack of 1/48 Zaku 2 primed
 
The backpack was sprayed in Steel & some highlights of Duraluminium, Burnt Iron & Brass on the vents, recesses & small exhausts brought out the detail.  The larger verniers were sprayed Duraluminium then the inner section in Burnt Iron. The cover for the back panel was primed & sprayed in Light grey.
Zaku 2 backpack painted with highlights
 
The armoured shoulder section & shield were fitted with the polycaps, glued, sanded & primed with the standard grey & allowed to dry.
Zaku 2 shield primedShoulder armour glued, sanded & primed
 
Matching the two tone blue scheme on the rest of the Zaku these were sprayed with light coats of UK Mediterranean Blue.
Shoulder armour painted & highlighted.
 
The torso now needed to be finished & with looking at the flow of the colours the upper & lower torso were sprayed with Light Grey & a few highlights with Steel on the connections & head collar that might be seen on the finished kit, but I wanted to do it for my own delight J.
The earlier primed side armour for the torso was painted in the paler U.K. Azure Blue & some highlights in Steel & Brass where required. The energy cables & the torso connectors did, like for the head, take a lot of time to get right & I followed the same method of Chrome base & light spray of Metallic blue (A.MIG-0196) that are just enough to provide a light blue tint. The front cover for the energy cables was primed & painted U.K. Azure Blue & highlights in Steel.
Zaku 2 torso parts ready for assembly
 
The front cable connector goes on first, and then the two sidepieces, the back cable connector & finally the front cable cover just push into place with no need for glue.
1/48 Zaku 2 side plates & connectors fitted
 
The inner part of the backpack goes over the rear cable connectors & then the two exhaust verniers pushed in to the bottom of the backpack.
1/48 Zaku 2 backpack fitted
 
With care not to scratch the painted surface of the energy cables gently, push them into place. All you then need to do is put the cover on the backpack & the main torso is finished.
1/48 Zaku 2 torso painted & finished
 

Friday 1 July 2016

1/48 Zaku II - Part 5


Time to do some work on the hip joints & lower skirt. The main section is just two pieces with two poly caps to fit the side skirts to.  This was filled, sanded & primed with Duraluminium.
Hip joint painted duraluminium on Zaku 2
 
The front & back armour & skirts were primed in grey

Front & rear armour primed

& allowed to dry fully followed by fine coats of U.K. Azure Blue (71.108) as the second blue shade I’m using.
 
 While the armour dried I went back to the hips & using “Metal Color” Steel, Burnt Iron, copper   (77.710) & Ammo Of Mig Brass on some of the fixing points & recesses to bring out the details. 
Two more poly caps went in the front of the unit & the painted front armour.

Detail work on hips & front armour fitted on 1/48 Zaku 2

 The rear armour just pushed into place & following the same detailing as the legs used small amounts of Gun Metal Grey in the recesses.

Finished rear armour now fitted