Models made by Airbrushheaven staff

Models made by Airbrushheaven staff

Thursday 31 March 2016

1/35 "Ingram 2" Patlabor - Part 3


 Time to do some work on the cockpit area even though a lot of it will never be seen again J.

The seat comes in 3 parts with the rear bulkhead details moulded on the main part.  I used Vallejo Grey primer for a base coat.


The rest of the seat & bulkhead were highlighted in Vallejo U.S.Grey (71.047), Fire Red ( 71.084), Black (71.057) & Plate Mail primer.


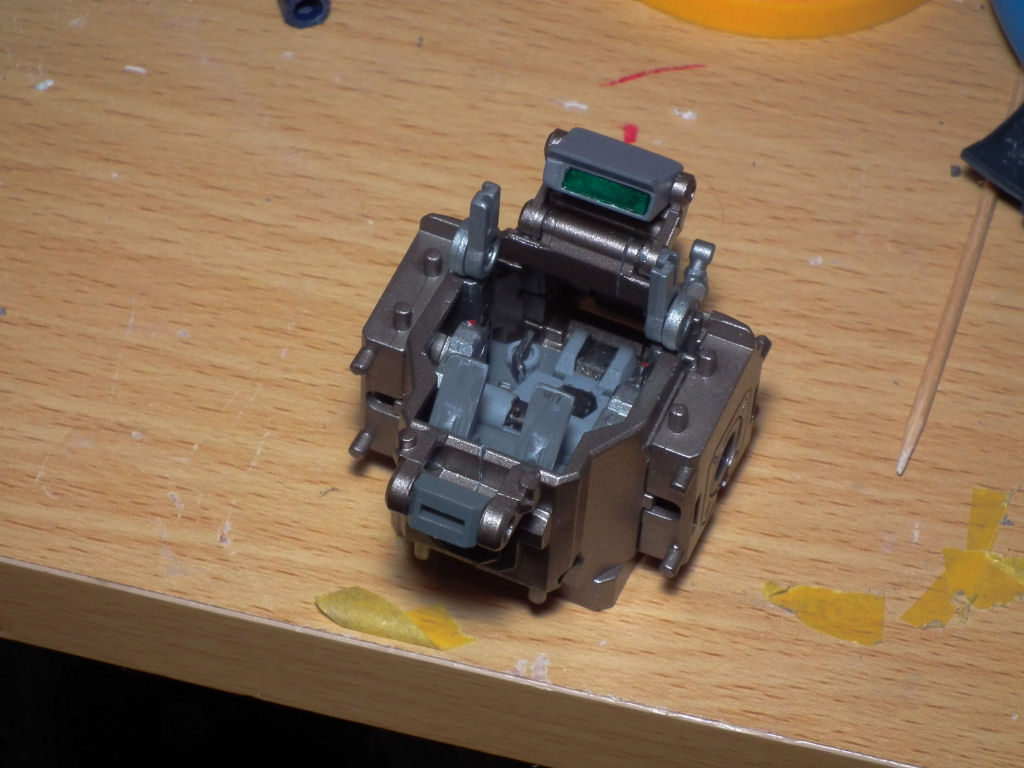
The side walls of the cockpit were sprayed with Grey primer, then 3 coats of Exhaust Manifold. To try & represent the display screens I used  “Ammo Of Mig” Crystal Green (A.MIG-092), but in the pictures it just doesn’t show the deep colour it gave.


The cockpit was screwed together as in section 24, where the poly caps & some small parts were fitted.  Please pay attention on how to fit parts D10 & D9 as they need to go in before you screw it together.
They need to go on the inside of the cockpit horizontally to click in place then gently rotate them so they sit upright.  The side pods of the body (D21 & D22) were sprayed the same way as the cockpit & the arms (D16,D17,F1 & F2) in Plate Mail primer. These parts then fit onto what now has become the body of the Ingram.

 The completed flip down screen (F9 & F10) were primed, then painted in U.S.Grey. This time I brushed some Aluminium (71.062) first into where the screen should be & when dry used the Crystal Green. As you can see this gave a much better result.    


The final part for now on the body was to lower body panel B37, which has been sprayed with the White primer & the grey rubber boot that should have gone on the waist.  The reason I fitted it here was there are 2 pegs it has to sit on at the front of the body & I could see it was easier to get these fitted first then place the lower body panel over the boot to lock it in position.

I am still not happy with how these rubber parts look even with the seam lines taken out & I wish there was a way to totally remove the mould lines & not ruin the detail.

Friday 11 March 2016

1/35 "Ingram 2" Patlabor - Part 2


The upper part of the legs will barely be seen, but that doesn’t stop me from painted them once built. Once the units were put together as in section 4 of the instructions they were sprayed in Vallejo Plate Mail primer (VAL 70.628) & allowed to dry.
Time to spray all outer leg armour parts & all of them were given a light sanding to remove any nub marks where they were taken off the sprue, but it also helps as washing them after also removes any mould release agent that can affect the paint going onto the plastic.
As mentioned at the start these were painted in a few light coats of Vallejo white primer (VAL 600) with light sand between coats when it was fully dry. Please make sure it is dry before you start to sand the primer.

It was at this stage I decided to do some detail work on the lower legs & my using a small amount of the following paints gave them a bit of a lift. I used Vallejo “Metal Color” Magnesium ( 77.711), Exhaust Manifold ( 77.723) & some “Ammo Of Mig” Old Brass (A.MIG-190)


The outer parts easily clipped into place & I left the legs on one side till later.

 Looking at the lights in the waist they are meant to be orange, but in the kit they are clear.  I have some “Ammo Of Mig” Crystal Orange (A.MIG-097) that will do the job nicely with 3 light coats.

The waist parts were sprayed in white & black primer then went together as in section 8, but I left off the rubber gaiter till a later stage.
Slight accident here as I dropped an open permanent paint marker on the waist unit while doing another model so had to re-spray the top after masking the rest off.

Friday 4 March 2016

1/35 "Ingram 2" Patlabor - Part 1


Moved away from armour kits for a while & going back to one of my 1st loves Sci-Fi, or in this case more correctly Gundam & Anime.

This kit is called “AV-98 Ingram 2” & is meant to be a 1:35 scale model of the armoured unit used by Tokyo police in the TV series.  These are meant to be just a snap fix kit with no painting, but I always paint & try to remove as many seam lines as possible, so here is how I built mine.

For all the white parts I am going to use my stock Vallejo white primer (VAL 600) as it goes on well, has a slight satin sheen when sprayed in very light coats & will not hide any of the kits detail.

To make both feet I put the “poly cap” (PC J) into part F14 & glued this & F15 together.  The seam lines were sanded down & the unit sprayed in Vallejo Plate Mail primer (VAL 70.628).
Finished ankle joint on Ingram 2 after sanding & painting

The sole of the foot (A3) & the base (A1) were glued together & allowed to dry.  The completed base & heel (A11) were sanded and sprayed Satin Black & allowed to dry.  The tops of the foot (I6) & (I1) were painted white then all the parts just press into the foot support.

Finished foot of the Ingram 2

The right hand leg has an opening side where a pistol sits & a mechanism pulls the gun out when the outer armour is moved.  The inner working (E9,16,17,23,24,25 & 30) were sprayed in Plate Mail  primer. 
Painted inner leg working of the Ingram 2
As the leg interior may be on show it will be painted & have some details added. The whole leg parts were primed with grey primer (VAL 601). The insides of part (D8 & D20) were given several light coats of Exhaust Manifold ( 77.723) from the Vallejo “Metal Color” range were applied to the inside. When dry the inner was masked & the outer sectioned sprayed with “Metal Color” Aluminium ( 77.701). This gives just a slight colour change when you put the final leg together.

Sprayed inner & outer parts of right hand leg of the Ingram 2
The inner working just push fitted together but pay attention to the manual as to how to fit part E30 as this need to move a certain way. 
Finished frame of the lower right hand leg of the Ingram 2

The left leg has no moving parts, but to keep the same colour scheme the parts D7 & D19 were primed & the inner & outer parts sprayed the same Exhaust Manifold & Aluminium colours.  The small fixing pieces for the legs (D14,D15,E18 & E19) were sprayed with Plate Mail  primer.