Now the engine is in & dried it will be very easy for me to fit the pre made rear suspension parts I did back in part 7.
The first parts to go in were the drive shafts, these were fitted into the transmission. Just a very small amount of glue used just to join the 2 together. While these set I made the 2 parts of the rear shock absorber ( C23 & C24) in section 17 & sprayed them satin black. When they were dry I fitted these together with all the other small parts in section 17 of the instructions in place & then the red rear springs went on the shockers.
Now comes section 18. PLEASE, please take your time & not too much pressure when fitting these parts as the locking hooks can snap very easily.
I found it best to connect the lower support brace (part F11) to the sub assembled rear uprights, then push both parts through the hole in the chassis, turn the chassis over to push the hooks into the fixing points on the rear bulkhead to start as it gave me the right amount of rigidity to the whole unit but still have enough room for it to move when connecting the rest. Next was to slide the small shaft for the rear shockers (C25) into the glued rear shockers on the chassis & slide the drive shafts into the holes in the uprights.
I then gently pushed the fixing bar C26 onto the rear uprights & then the remaining 2 hooks on parts H15. Please see picture below that shows one of the hooks on H15 must go below the fixing hook on bar C26 for the suspension to sit right.
All I then needed to do was glue the pin H20 through the link arm of part F6 & into the rear upright.
The rear suspension now works & ready for the wheels at a later stage.
As our motto says Martyn uses the airbrushes etc. we sell on his own models, so we know they are up to the job.
Models made by Airbrushheaven staff
Friday, 24 July 2015
Friday, 10 July 2015
1:12 Tamiya Porsche 910 :- 8- Rear subframe & engine mounting
I've a good long look at the instructions on how the sequence goes for fitting the rear subframe, mounting the engine & rear suspension to make my life easier, so after a bit of thinking I worked out a different way that works for me & the way I want to paint the model.
In section 8 I made the rear space frame making sure parts G10 & F5 will move as this helps with fitting later. In section 9 personally I cannot see how the rear subframe sides will sit on it's own in a stable position for either mounting the engine or for when they fit the rear bulkhead. So just to start I fitted the painted lower links to the chassis, then fitted the engine mount to fix it in place. To go with the colours of the interior frame I painted some of the support beams in satin black.
Before fitting the engine I dry fitted just the rear bulkhead in place & then glued the 2 side supports A7 & A8 to the back. After allowing it to set overnight I took it out & sprayed the whole unit satin black.
I glued the completed rear bulkhead in position then found it easy to mount the engine into the rear first & only needed a small amount of glue on the bottom mount & the fixing point on the rear bulkhead. The pre assembled space frame was glued onto the top of the rear framework & attached to the rear of the chassis.

In section 8 I made the rear space frame making sure parts G10 & F5 will move as this helps with fitting later. In section 9 personally I cannot see how the rear subframe sides will sit on it's own in a stable position for either mounting the engine or for when they fit the rear bulkhead. So just to start I fitted the painted lower links to the chassis, then fitted the engine mount to fix it in place. To go with the colours of the interior frame I painted some of the support beams in satin black.
Before fitting the engine I dry fitted just the rear bulkhead in place & then glued the 2 side supports A7 & A8 to the back. After allowing it to set overnight I took it out & sprayed the whole unit satin black.
I glued the completed rear bulkhead in position then found it easy to mount the engine into the rear first & only needed a small amount of glue on the bottom mount & the fixing point on the rear bulkhead. The pre assembled space frame was glued onto the top of the rear framework & attached to the rear of the chassis.

Friday, 3 July 2015
1:12 Tamiya Porsche 910 :- 7- Rear suspension preparation
Now to do the rear suspension on the Porsche. First job was to make up the 2 drive shafts in section 10, but from experience I have never seen joints chromed so I removed it, built the shafts then painted them in gun metal grey.
The rear uprights from section 18 were built up, the main body sprayed in satin black, then the link rods & nuts highlighted in oily steel then Gun Metal Grey to give a more realistic effect. The lower link arms & damper links were painted in natural steel ( 70.864).
Friday, 19 June 2015
1:12 Tamiya Porsche 910 :- 6- Underfloor & suspension springs
Back to the lower part of the Porsche & to paint the under floor. Had some different ideas on what colour to do for the whole car, but we had just seen a nice blue Aston at an race so decided to do it in a similar shade of blue.
Best match was a Halford's car spray, which now does go well on plastic kits. After masking off all floor area of the car that had been done before it was sprayed light coats of grey primer to give the paint a good base, giving it a light sand between coats to give a good base.
When fully dry after 24hrs I gave the under floor gradual light coats of the blue using very fine grade sanding sticks between spraying. When done it had a final coat of clear lacquer to help with the finish.

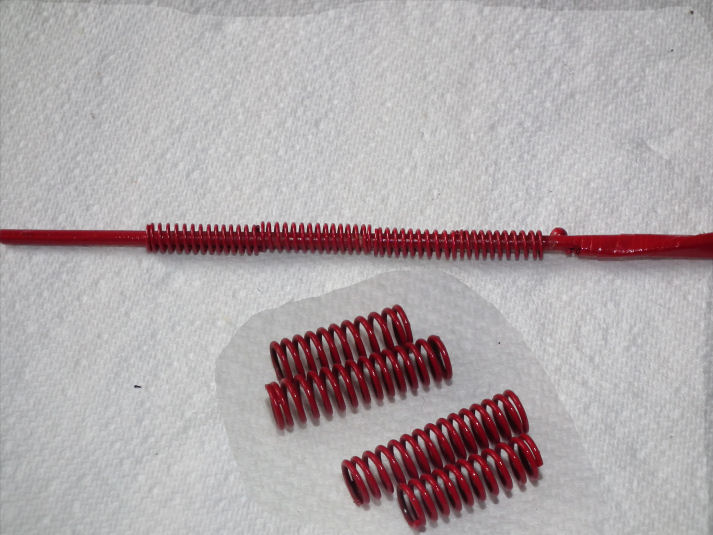
Time to spruce up the car's springs. I could have left them black, but we have seen on race cars quite a few powder coated in red, yellow etc. I sprayed the springs in Humbrol matt primer, then a couple of coats of gloss Bright Red (Humbrol 19). A good way to hold them while painting was to use a skewer to hold all the springs in place allowing me to turn them while spraying.
Best match was a Halford's car spray, which now does go well on plastic kits. After masking off all floor area of the car that had been done before it was sprayed light coats of grey primer to give the paint a good base, giving it a light sand between coats to give a good base.
When fully dry after 24hrs I gave the under floor gradual light coats of the blue using very fine grade sanding sticks between spraying. When done it had a final coat of clear lacquer to help with the finish.

Time to spruce up the car's springs. I could have left them black, but we have seen on race cars quite a few powder coated in red, yellow etc. I sprayed the springs in Humbrol matt primer, then a couple of coats of gloss Bright Red (Humbrol 19). A good way to hold them while painting was to use a skewer to hold all the springs in place allowing me to turn them while spraying.
Friday, 12 June 2015
1:12 Tamiya Porsche 910 :- 5- Exhausts
Now to do the exhausts. The pipes were done as per stage 7, but to make sure the pipes C16 to C21 set in the right position I dry fitted them in the mounting holes on the engine block till set. All what was then needed was to sand & fill the complete system to remove any seams.
When it came to painting I followed Tamiya's instruction & sprayed them Black... WRONG! just see below how they came out
Having seen race cars this is not how it should be. Time to give them a sand to take off most the paint without removing any detail & re-do them.
This time I gave them a base coat of Vallejo grey primer & allowed it to cure. The front part of the pipes in a 1:1 mix of Vallejo Gun Metal Grey & Matt Black & the box section in just Gun Metal Grey. The rear pipes were done in Vallejo Buff (976) as if coated in a heat protective layer & allowed this to dry for 48hrs. All that was needed then was to scratch back some of this layer to show the grey base to simulate wear & tear. To me these now look more real than before.
With the pipes set at the correct angle they glued into the engine block with no issues & there you have the complete unit ready to mount in the chassis.
When it came to painting I followed Tamiya's instruction & sprayed them Black... WRONG! just see below how they came out
Having seen race cars this is not how it should be. Time to give them a sand to take off most the paint without removing any detail & re-do them.
This time I gave them a base coat of Vallejo grey primer & allowed it to cure. The front part of the pipes in a 1:1 mix of Vallejo Gun Metal Grey & Matt Black & the box section in just Gun Metal Grey. The rear pipes were done in Vallejo Buff (976) as if coated in a heat protective layer & allowed this to dry for 48hrs. All that was needed then was to scratch back some of this layer to show the grey base to simulate wear & tear. To me these now look more real than before.
With the pipes set at the correct angle they glued into the engine block with no issues & there you have the complete unit ready to mount in the chassis.
Friday, 5 June 2015
1:12 Tamiya Porsche 910 :- 4- Finishing the engine
To give the engine a bit of a "used" look & to highlight some of the details I painted the oil cooler grill on the gearbox with Gun metal grey (70.863) together with some dry brushing of the engine block with it. I painted the alternator, fuel filter unit, distributor & the belt/pulley in matt black. The fan unit was first painted in Black metallic (71.073) Then the blades & the pulleys were painted Gun metal grey to make them stand out.
These were fitted to the engine together with the painted fuel pump (Part No. F3), the rear gearbox support & part C15. Using the clear tubing I cut the fuel pipes to the lengths given & using a thin superglue fixed them to the engine block.
I found that some of the clear tubing measurements are also a bit too short for my liking, so I advise to add 5-7mm to each & then test fit & cut as required. As you can see below a couple of mine show a nasty kink in the tubes, which in a real car wouldn't happen.
When it came to fit the ignition wires I had a suspicion that the tubing diameter was too thin to go on the engine block & when testing it out found this to be true.
It was OK for the distributor but no way could I get it to go on the engine. I keep silicon tubing used by carp fishermen that comes in different diameters for various projects & by using this to make a spark plug "cover" it got round the issue as small bits of tubing were glued to the engine block & then the tubing from the kit was glued inside these instead.
These were fitted to the engine together with the painted fuel pump (Part No. F3), the rear gearbox support & part C15. Using the clear tubing I cut the fuel pipes to the lengths given & using a thin superglue fixed them to the engine block.
I found that some of the clear tubing measurements are also a bit too short for my liking, so I advise to add 5-7mm to each & then test fit & cut as required. As you can see below a couple of mine show a nasty kink in the tubes, which in a real car wouldn't happen.
When it came to fit the ignition wires I had a suspicion that the tubing diameter was too thin to go on the engine block & when testing it out found this to be true.
It was OK for the distributor but no way could I get it to go on the engine. I keep silicon tubing used by carp fishermen that comes in different diameters for various projects & by using this to make a spark plug "cover" it got round the issue as small bits of tubing were glued to the engine block & then the tubing from the kit was glued inside these instead.
Friday, 29 May 2015
1:12 Tamiya Porsche 910 :- 3- More engine block work
Back to stage 4 & fitted the cylinder heads to the engine block & the front mounting point (Part H4). I checked beforehand that the fan belt would still go on at a later stage if I was to fit the mounting block.
Next was to make up the main gearbox housing bar the rear mounting plate (Part A6). After filling then sanding fixed it to the engine block leaving off the filter & starter motor. I made the air intake parts (H12 & E3). Fitted these to the top of the block.
The whole unit was then sprayed with a few light coats of Vallejo "Model Air" Aluminium (71.062). I then just gave it a light mist of "Model Air" Steel (71.065)
Next was to make up the main gearbox housing bar the rear mounting plate (Part A6). After filling then sanding fixed it to the engine block leaving off the filter & starter motor. I made the air intake parts (H12 & E3). Fitted these to the top of the block.
The whole unit was then sprayed with a few light coats of Vallejo "Model Air" Aluminium (71.062). I then just gave it a light mist of "Model Air" Steel (71.065)
Subscribe to:
Posts (Atom)