Models made by Airbrushheaven staff

Models made by Airbrushheaven staff

Friday, 23 October 2015

1:12 Tamiya Porsche 910 :- 12- Fixing build & kit issues


Going to leave the chassis for a while to sort out faults with some parts & kit mould marks before I get to work on the rest of the build.

One major problem is the pipes for cooling the brakes & gearbox in section 8.  When I did a test fit I could see there was gap between to 2 halves, but only when they were glued together could I see how bad it was as shown in the picture below.

Large gap in part on Tamiya Porsche 910


There may be other ways to repair this, but I put a couple of thin strips of plastic card into the hole to narrow the gap, then using thick gap filling superglue put some in to part fill the hole in.  When dry I put a bit more in to just above the good part of the pipe, then gave it a light sand to re-form the shape of the pipe.

Repaired intake pipe on Tamiya Porsche 910


Once I had the basic shape I used both medium & thin superglue where needed on the rest of the pipes to produce a smooth finish.  After sanding one of the thin glue stages I checked on how it was going by my usual technique of putting some paint on the pipe to show any areas that still required work. 

Test painted intake on Tamiya Porsche 910

After 2 layers of the thin glue I had got the pipes to how I liked & then gave then a final coat of Matt Sea Grey (Humbrol 27).
Primed air intake on Tamiya Porsche 910
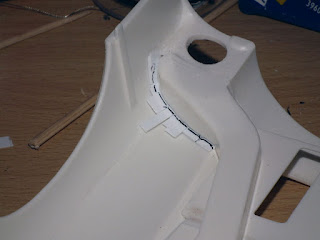
The bonnet & roof sections (J10 & J12) have very large round mould marks that needed some filler, then thin superglue treatment to make a smoother appearance.

Roof & bonnet repair to Tamiya Porsche 910

Now comes another case of bad fitting.  When doing a test fitting of the air intakes that feed to the ill fitting earlier pipes there was a very large gap between the body & pipe when fitted in the correct position. 
Using various thicknesses of plastic strip ranging from 0.5 X 4.5mm down to 0.25 X 0.5mm I started to carefully build up a piece to fit the gap.  Between each layer I did a test fit to see how it was going & what still needed to be done.

Fixing gap in air intake on Tamiya Porsche 910

When I had got as close to the desired look possible with my skills I trimmed off all the excess pieces of card to give me the final filling piece.  As you can see the LHS & RHS are different showing how poor the fit is on the model.

Completed filler part for intake on Tamiya Porsche 910

The bridging pieces were then glued into place & a final coat of thin superglue & sanding to make a very nice smooth appearance.
Close up of fininshed repair to intake on Tamiya Porsche 910.

Friday, 9 October 2015

1:12 Tamiya Porsche 910 :- 11- Wheels & front suspension


The completed front bracing was fitted & glued in place with no problems as it dried in the correct position previously.  The completed supports for the steering rack were glued in place & allowed to dry.

While this was drying time to work on the wheels & front suspension.

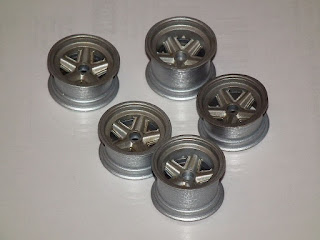
The brake discs were sprayed in matt aluminium on one side & the other was super-glued the metal discs. The wheels were painted in a Matt Aluminium, but when I did a test fit to me it just looked too shiny.

Wheels on Tamiya Porsche 910 too shiny


To dull the wheels I gave them a light airbrush coat of Matt Antique Bronze (Humbrol 171) just to give some contrast to the brake discs.

re-coated Tamiya POrsche 910 wheels to dull them down.


As usual with most models the rubber tyres come with a mould mark going down the middle which needs removing.  I use a very sharp scalpel blade to take the larger parts off, then using a coarse then fine sanding stick finish off the seam & the whole tread area gets a fine sand to give it a used look.

Picture of sanded down tyres of Tamiya Porsche 910


The finished tyres were just placed on the wheels for fitting later.

Back to the dried front section & the steering rack & rubber gaiters ( A5 & L2) went in place & the shift lever assembly glued to the floorpan.


The front suspension parts from section 15 were painted in the Satin Black used in previous parts & then highlights of Matt Aluminium to bring out the bolt heads.

Tamiya Porsche 910 front suspension painted


The springs were sprayed in the matching Humbrol Dark Red as the rear springs.

Tamiya Porsche 910 springs painted red


The whole front suspension was fitted as in section 16 of the instructions & allowed to set,

Front suspension fitted to Tamiya Porsche 910